PhotobucketPhotobucketPhotobucketPhotobucketPhotobucketPhotobucket

July 27, 2011

Top Knot Baby Cap

As each of my grandchildren have arrived in the world, I have noticed that the hospitals now place a little cap on the babies, to help them keep their body temperature stabilized.  These little newborn caps, are usually just made from a tubular bandage of some kind, that is simply cut and tied in a knot.
Thus I felt the need to create my own little "Top Knot Newborn Cap".  It is a simple design, which can easily be knit in an hour, and it takes very little yarn (about 25-30 yards of soft, worsted weight yarn).  It is knit flat, and seamed up the back when finished.  It could also be knit on double-point needles, to prevent the seam.

The "top knot", is an attached I-Chord (knit on 2 - double-point needles), which has the end thread woven back in, and is tied in a loose knot.  I knit these in many colors (to match receiving blankets), for my newest grand-daughter.  My free pattern for these little hats, can be found at:  http://www.ravelry.com/patterns/library/top-knot-newborn-cap


She was born on a Friday evening, and was featured on the local news within hours of her birth.  Her Father is the Chief Meterologist at the largest television station in Idaho Falls.  And even though her Mother's hair was sticking up in the back, Nola looked great for her TV de'but.  She has become quite a little performer, so perhaps she will grown up to be a weather girl too, or judging by this picture, maybe the host of the "travel show".

Here is Baby Lily, modeling my latest creation.  I think we should have tucked her little ear in.  This would have been rather uncomfortable, if she had been required to wear it for very long . . .

She wasn't too happy about wearing it here, but then it was 90 degrees at the time.  Her six year old sister, Meagan was the photographer, and Lily was a little wiggly.  This little blue hat is going to Camille's new little guy.  I wish you the best, Camille, when your delivery time arrives.

Heather . . . if you are reading this, here is a picture of the blessing outfit for your little expected guy.  You may notice that the pants are missing.  Carissa is knitting away, to get them done before your little guy arrives.  I know that you have been put on bed-rest, and I hope you are doing well. I also hope that you are getting some cooperation from Ella.

Happy knitting . . . to all you expectant Grandmothers out there.

July 20, 2011

Lori goes to Camp and the Bubbles Headband

Last week I had the pleasure of attending a Girl's Rough-Out Camp.  We went to The Spruces Campground in the beautiful Utah Wasatch Mountains.  It was really pretty there, although the river was running really high, with all of the late spring run-off.  And, it was really COLD at night.  I slept with a sleeping bag inside of a sleeping bag, and a sweatshirt with the hood tied up tight.  But, the daytime temperatures were pleasant, and there weren't too many bugs.
We went on a grueling 5 mile hike the first day.  Here we are resting, after a steep, straight-up climb. 

I only lasted to the half-way point, when 8 of us, turned around and hiked back to the cars.  Six campers went on to Dog Lake, with our marathon-running leader, Lynnette, and one of the girl's Dad.  Lynnette and I are about the same age, but running has certainly put her in better shape.  I need to get working at that!

Fea, Noni, Alex & Clarissa

I was asked to develop a craft the girls could be taught.  I decided to design a simple crocheted headband, and a pillowcase with an iron-on stencil, colored by the girls.  Here they are working on those pillowcases.  The headbands were a little harder for them to master, but each of the Leaders made one, along with Alex and Courtney.  They were really quick learners, and Fea agreed to be my promotional model.  She wore my first sample on the hikes and throughout all of our time there.  It was a really good test, because she has the most beautiful, thick, curly hair, and the headband kept everything in place, whether her hair was down, or up.
Here I am, wearing the single row version of my latest design, "The Bubbles Headband".  It is a free pattern download at:  http://www.ravelry.com/patterns/library/bubbles-headband.
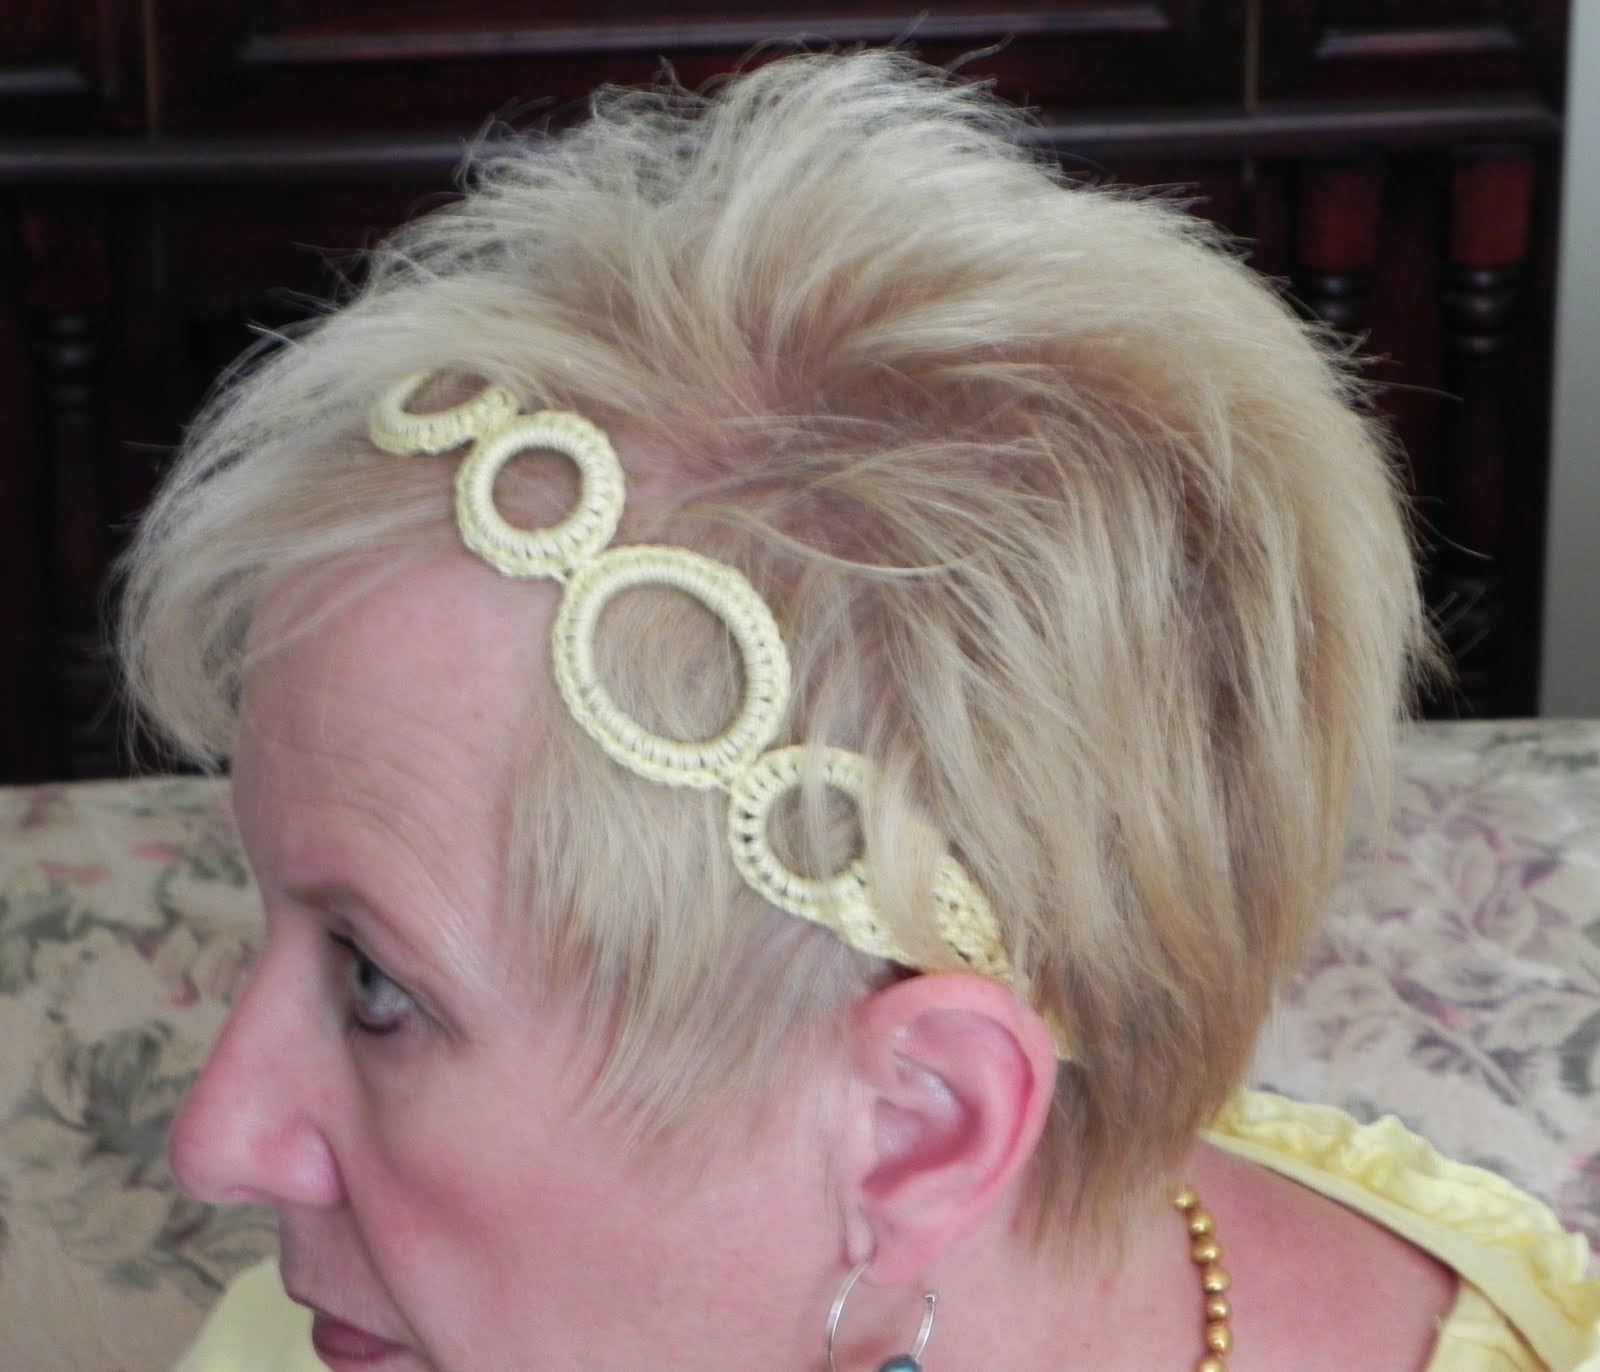
Emily is modeling the double row version.  The headband is made by working single crochet stitches around soft rubber rings (1.5 inches). 

I didn't have time to do an extensive search for the perfect rings, so I lifted some "O" rings from my husband's auto repair supplies.  I'm not sure what "O" rings are used for in engines, but they work great in headbands.

I thought the headbands would work great to tame those shorter, fly-away hairs around the face.  In this picture, Alex had just played a tough softball game.  We tied the headband on after the game.  If it had been worn during the game, her ponytail wouldn't be such a mess, as it would have held those errant hairs in-place.

When the other girls on her softball team saw Alex's headband, they all wanted one, so I guess I'll be doing some major crocheting this weekend.  I hope my husband's supply of "O" rings holds out, and that he doesn't actually need any of them for making repairs.  I'm not really sure where you buy them, or what they cost.  I thought I would look around at Home Depot or Lowes, to see if a similar-type facet washer was available.

Oh, and by the way . . . Alex's softball team took First Place in their League.  They played all games without a defeat.  Congratulations everyone, including their newest team member, Tarzan!!  Tarzan was recruited when found hanging from a tree, when a home-run ball was hit.  Rosie went into fast action, and yelled, "Hey, cute guy, could you throw us that ball?"  They have been dating ever since.

Here are the supplies that are needed, along with a picture of a single row version, in process.
This pictures shows a double row version, and two single rows, with the ends woven in and one tie attached.  I was afraid that perhaps I was too old to be wearing such a hair accessory, but I decided to give it a try, and found it very comfortable.  I think I'll make me a few more, in various colors.  Happy Knitting . . .

July 18, 2011

Lori Shrugged - Part II

I've finally completed all of the "test knitting" for my Pattern "Lori Shrugged".  It seems that everyone in my family wanted one, which was flattering, since this was the first originally designed pattern I was planning to sell.  Flattery quickly turned to time consuming, so I am happy to report, that I am finished!
This shrug was knit for my daughter-in-law.  She is a tiny little thing, so it went quite quickly. 

It is knit of an ivory colored cashmere blend.  It is so soft.  I think she will love it.

The lacework really shows up well in this color and weight yarn.

This shrug was knit for Alex for her birthday. 

You can tell that a heavy weight yarn was used.  It looks quite nice with the denim skirt she requested to go with it. 

It is a little harder to see the lacework, with a heavier yarn and a darker color.  She was really pleased to receive it.  It will come in handy when she starts school in the fall.  She is finishing up her Bachelor's Degree at the University of Utah, then it's on to Medical School.  She'll be applying to several schools in the spring, but since she plans to become a Physical Therapist, there are only a few that offer the program.  She could be moving to Colorado, Idaho, or Nevada, depending on where she is accepted.  We all have our fingers crossed for her acceptance at the University of Utah, but we'll take whatever she gets, and we'll be happy about it.

You can purchase and download this pattern (Lori Shrugged) at:  ravelry.com.  I would love to hear from anyone who tries knitting this pattern.  I am just a beginner designer, and would love any feedback for improving patterns in the future.