PhotobucketPhotobucketPhotobucketPhotobucketPhotobucketPhotobucket

March 29, 2018

Important Finishing Techniques

As I mentioned in previous posts, my sweaters continue to improve.  These improvements are mostly because I have improved my finishing techniques.


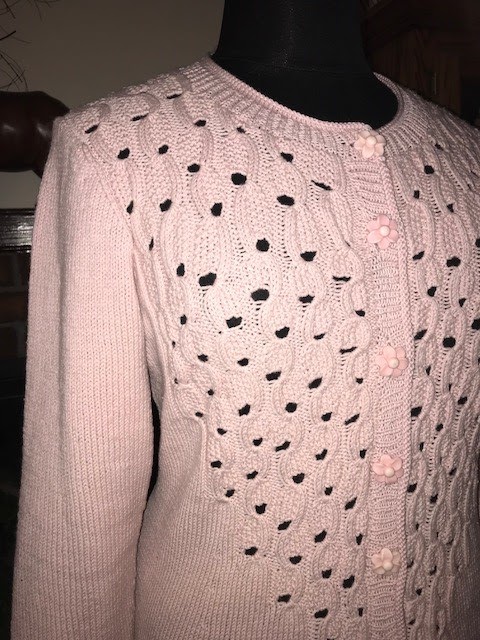
Although I have vastly improved the buttonbands and neckband on this cardigan I knit in 2016, I haven't really mastered the "selfy".  My intent was to show you how this sweater looks on ME.  The new buttonbands don't stretch out, causing the front of the cardigan to hang funny.  It used to be difficult to wear, because I was forever trying to get it to hang properly on my body.  Now I love wearing it!  This makes the time and expense well worth it.

The finishing skill employed here, was using a much small needle for the bands, than called for in the pattern.  This cardigan was knit on US6 needles, and the buttonband is knit on US2 needles.  This creates a more stable fabric for making stable buttonholes and attaching buttons.  You'll note that I used a sewn bindoff on the button side.  This is a stretchy bindoff that lays really flat.  To learn this technique, go to:  https://www.youtube.com/watch?v=u-Fy4GkpjPg.  The rolled edge employed a standard bindoff.
I like the new button choice too, and the buttonholes match them perfectly, without any strange holes or pulling when they are buttoned.  In addition, using the small, clear buttons on the back, makes the buttons much more secure, and keeps them from drooping when the cardigan is buttoned.  To learn this fabulous, one row buttonhole, go to:  multi-stitch buttonhole.
My "Mousy Tail Clone", copied from Jankee, is nearing completion.  You can see the body shaping I've used on this sweater to assure it will fit me perfectly.  I used a Custom Fit Pattern in getting all the numbers necessary and shaping instructions to get this custom fit, just for me.
Can you see the side seams?  The only thing that gives it away, is the curve that adapts to the curves of my body.  I didn't used to think that using the "Mattress Stitch" was necessary to create a great seam.  I was wrong!  Now that I take the time to seam with the "Mattress Stitch, my seams lie flat and they don't pull apart.  To learn the "mattress stitch" technique, go to:  Seaming with the Mattress Stitch.
Lastly, I thought I would talk a little about my blocking technique.  I always soak my sweater pieces in cool water, roll them in a fluffy towel taking care not to stretch the pieces, and squeeze out as much excess water as possible.  DO NOT TWIST KNIT PIECES.  Then lay the pieces out flat on a blocking board and carefully manipulate the pieces to the measurements on your pattern schematic.  Pin where necessary to hold in-place until the pieces dry.  Do not stretch and pin any ribbing, as you'll want this stretch to spring back with each wearing.  I love these Blocking Combs, they prevent points in your knitting.  You may not be able to tell from this photo, but I have stacked two sleeves here, to dry together.  This assures both sleeves will be the same exact size when they dry.  I do the same with the back and front pieces. My arms may not match exactly, but my sleeves always will.  You have to use optical illusion whenever possible, haha.

I'll have pictures of this finished sweater in my next blog post.  I'm currently working on the buttonband and adding the buttons, as discussed previously.

I'm busy planning my next sweater projects.  Here they are:

First, I'll be knitting "Sprossling" by Anne Hanson.  I'll be knitting with Wollemeise Twin.  It is a great yarn of 20% nylon and 80% wool in a fingering weight.  I'm planning this as a summer sweater to wear over summer sundresses and tank tops.

Second, I'll be knitting "Cabled Cardi" by Norah Gaughan.  I'll be knitting with Wollemeise DK.  I just love this yarn and can't seem to move on from it.  

You can see that I have my swatches all knit up and ready for generating my Custom Fit Patterns for each.  I'll be knitting Sprossling as written, but Cabled Cardi will have long sleeves and a slightly longer a-line fit.  I'm hoping these changes will be more flattering to my shape.

I hope these little tips and tricks, that I've learned recently, will help you too.  Being open to change is the best possible way to improve.  Thank you to those knitters who have gone before me, and figured out the best possible methods for knitting perfectly beautiful sweaters.  If you are a member of Knit Night Group, take a good look at these techniques and let me know if I can help you with future projects.  To the rest of you . . . . . . . Happy Knitting.

March 20, 2018

Change?

One thing is always constant, and that is change.  It may seem like a contradictory statement, but it is a definite truth.
This is a recent picture of my formal living room.  A few things have changed over the years, but for the most part, everything has been the same for the past 30+ years.  It takes me some time to decide just how I want a room decorated, adding a piece here or there, as I find the things I really love.  I'm not much for following the trends, as I prefer timeless pieces, that I plan to keep for many, many years.  

The floral couch was a hand-me-down from my parents, and they found it in a chicken coup when they were first married (back in the 1950's).  It has been re-upholstered several times, even twice by me, but I still love it and plan to keep it for many more years.  Curious, that it was stuffed with horse hair and originally had 3 cushions, rather than the current 2.  The tables were an early marriage purchase that I had to save and save for, and even though my daughter took a hammer to them, when she was 2 years old, I continue to polish and care for them.  The coffee table does have a new top, which I had custom built a few years ago. I have replaced 2 chairs, but only because they completely fell apart. I replaced them with matching antique chairs, found in a re-sale shop.  The wood floors and the purple loveseat are a recent edition, but the only new additions in the past 10 years.

I'm afraid I'm not the same when it comes to knitting.  My knitting abilities are continually improving, and I learn little tricks and hints from other expert knitters.  The downside to this improvement, is the fact that I start to hate wearing my older sweaters, as I produce better ones.  The new sweaters have improved technique, and fit and drape better than the old ones.  Good yarn is far too expensive for me to allow sweaters to just lay around,  waiting for moths to get to them.  I've been known to completely rip a sweater apart, and to re-knit the yarn into a completely different design.
You may recognize this sweater, completed back in 2016.  It is a custom fit version of Effervescence Cardigan[to see all the details, view in a previous post].  I've worn it a lot in the past few years, but have come to hate the buttons.  Even after sewing the buttonholes to make them smaller, the buttons will never stay buttoned.  And, the front buttonband fans out during wearing, causing the front of the cardigan to hang oddly on my body.


Recently, I have learned so much about buttonbands and buttonholes.  This new knowledge has made this sweater completely irritating to wear. So, I cut off the button and neck bands, and re-knit them, using my newly learned techniques.  Complete with new buttons, I love wearing this sweater now.  It was well worth the time and effort to make it wearable again.  

I guess change is not always an irritation, especially when it is your skill that is improving.  I learned these new techniques from Jankee.  You can learn them too, by reading all of her project comments on ravelry.com.  This is a great knitting resource, when you want to learn, without the expense and time of a knitting class.

Sweaters do not have to be completely scrapped and re-knit.  Sometimes, just some simple adjustments can turn a "sweater dud" into a "sweater love".

Keep your knitting skills progressing, by learning from other's mistakes.  Check out all of the projects on ravelry, especially the projects already completed on the project you are about to start.  This can save you countless hours in overcoming errors in the pattern design.  Happy Knitting . . . . .

March 05, 2018

Herringweave Complete

I started my Herringweave, by Anne Hanson, back in November.  I can generally knit an adult  size sweater in about a month.  This one was the exception.  The intricate herringbone pattern made it difficult to get into a smooth, knitting rhythm.  Needless to say, here it is . . . 4 months later, and I am just now finishing it up. 

This was my problem a few weeks ago, I had added back too many stitches on this buttonhole, causing it to flair out.  It was not a good look.  I had created a sewn bindoff (a first for me), so it took hours and hours to unpick it.  In addition, it completely ruined the length of yarn, which I was short on anyway.  But . . . it was well worth the effort.
You can see here, that I didn't have enough yarn to complete the buttonbands, so I had to rip out my swatch to complete them.  Thank Heavens, I had a swatch, the buttonbands still were no as wide as I preferred, but sometimes you have to take what you get.


The much improved buttonholes with the sweater unbuttoned and completely buttoned up.  The sweater was knit of Wollemeise DK, in the color Grundfink.  This is my "desert island" yarn, and it is hard for me to chose anything else.  It is so smooth to knit with, the colors are so vibrant, and it wears like iron.  There is very little pilling that happens with this yarn.


As on all sweaters I knit, I learned some great new things on this sweater (which always makes it hard for me to go back wear my old ones).  As always, I did a thorough search on Herringweaves knit by others on Ravelry.  This is such a great resource.  I looked for problems others may have had with the pattern, the yarns they had chosen, and any suggestions they might have for future knitters.  This helped me to know how the pattern would knit up in my beloved Wollemeise.  I also looked at the button sizes used by others, and any modifications they might have made.  Since I was also working from a Custom Fit Pattern, I knew it would fit, but I wanted to get the best possible look.

As I was planning my next project, I came across a finished sweater in the Custom Fit Groups, knit by Jankee.  In her comments, she gave specifics on how she achieves the perfect buttonband.  I used all of her recommendations for this sweater, on how to knit the buttonband, how to place the buttonholes, the best possible size of buttons, and how to properly sew a shank button using a Lucifer, and placing a small button on the wrong side.
Wow, what a difference these things made.  I'll never knit a buttonband any other way.  It really reduces gapping when a sweater is buttoned all the way up.  She also recommended using a sewn bindoff, for its stretchiness and the nice clean edge it provides.  It is time-consuming, but well worth the time (even when you have to unpick it).  I highly recommend her method.

I've nearly finished the fronts of my next project, which is basically a copy of Mousy Tail Clone, by Jankee.  There is not a pattern for this sweater, but using a Custom Fit Pattern, you really don't need one.  All of her suggestions have made it easy sailing on this one.
Since my last post, I've spent some time with my Mother and Sisters, celebrating a milestone Birthday for my Mom.  It was a great evening spent with a great view of the Salt Lake Valley.  These are some of the most valued people in my life.  They are the ones I whine to, cry with, ask for advice, and best of all . . . laugh with.  I hope you all have people like this in your life.  All though it helps to calm and center us, knitting is not always the only solution.  HAPPY KNITTING . . . . . .